
Loxa Web Site Export - Tutorial
Table of contents
- Installation
- Before run Loxa Web Site Export
- Running the plugin
- Files generated
- Customizing the web site
- Recomendations
- Feedback and support
Installation:
Visit the Gephi page How to install a plugin?
Before run Loxa Web Site Export:
The plugin works with the project's name and workspaces's names, therefore you have to check the following:
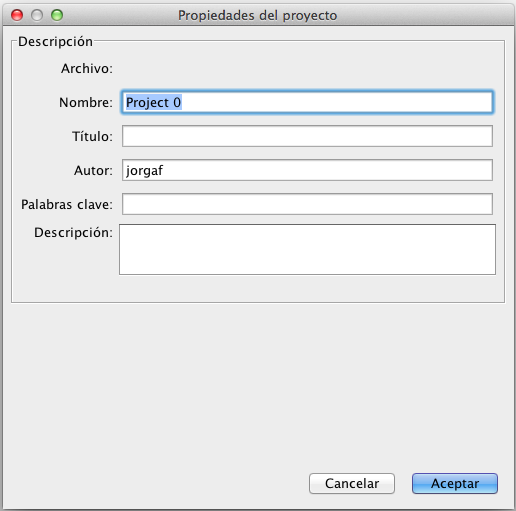
- The project's name have to be descriptive, because it is exported as menu and option group. To change, go to menu File->Properties and change the name field value.
- You have to have one o more workspaces. Each workspace have to have a graph.
- The workspace's names have to be descriptives, because them are exported as items of a menu and options in a combobox. To change, select each Workspace and go to the menu Workspace->Rename.
- The plugin uses the preview settings (inclued layouts), therefore you have to set the preview settings before the running the plugin. The settings can be different in each Workspace.
You should set project properties, this data is used to customize the generated web pages. To do that, go to File->Properties. The Title will be used as title page, Keywords with the meta-tag keywords and Description in the page which is shown when click About analysis link.
All the changes proposed can be done after generation, it will be explained later.
Running the plugin:
To execute the plugin, go to File->Export->Web site exporter... and you will view the following image:

- Path, is the directory where the plugin will create your web site.
- Select workspace(s). You can select the workspace that will be exported and calculated some metrics for the visible graph (Average degree, Avg. Weithed Degree and Density). You have to select at least one. The UI show only the workspaces that have a graph.
- The GEXF settings will be used to resolution and margins of the image.
- The Ok button start the plugin.
Files generated:
The files generated are showed in the next image:
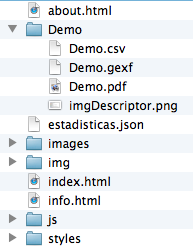
The plugin generated the following directories and files:
- The root directory with the project name (without spaces)
- For each workspace, a directory with same name of the workspace (without spaces). Inside: <workspace name>.csv that is the graph file, <workspace name>.pdf image file. If you configure partition, the plugnin generate a file called imgDescriptor.png with the partition's color description. Do not modified.
- 3 html pages. You can customizing every web page. Be carefull with the index page
- estadisticas.json. It you have to modified. You will see how to do it in the next section.
Customizing the web site:
The information to customizing your Web site are in two files: index.html and estadisticas.json.
Let me start with estadisticas.json. The following images show where the information is placed in the web browser:
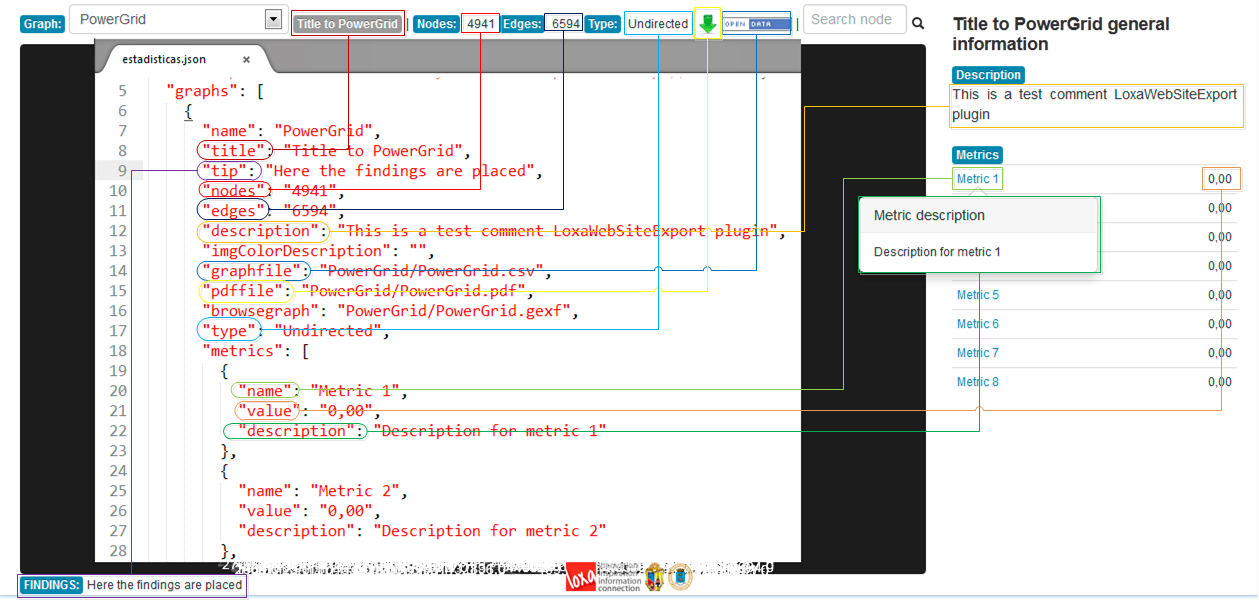
The information that you can change is selected, as well as your position in the Web page.
You can use HTML tags in the values, it let you enhance your text and show special characters.
Warning: Do not modify the value of the name attribute, because it represent the name of the directory where the files of the graph are stored.
The layouts attribute is not used, but it will be used in next versions, do not erease it.
Now the index.html file:
- Do you want change the text that showed in the combobox? (Example: ...>Workspace0</option>). Do not change the value of the atrribute value, it represent the name of a directory..
- Do you want change another text?You can search it and change, but be carefull, that the text is no enclosed as showed the above point.
Recomendations
- Before run the plugin, configure each workspace and use the preview to check if all is well.
- The plugin does not update Web sites created. It deleted all files and are created again.
Feedback and support
If you have problems or suggestions, let us know, please email us to jalopez2[at]utpl.edu.ec or nopiedra[at]utpl.edu.ec
Back to Top...